
Corporate Event Photo Collection: A Simple Checklist
If you want event photos in one place, I’d keep the process simple: set one goal, assign two people, post clear QR signs, test the upload flow, and clean up files within 24 hours. That’s the whole system.
Most teams lose photos because they end up split across phones, text threads, Slack, and shared folders. A QR-based upload page fixes that by giving guests one link to use - no app, no account, no extra steps. For teams, that means fewer missing files, fewer follow-up messages, and a gallery that’s ready for recap, sponsor use, hiring, or internal sharing.
Here’s the short version of what matters most:
- Pick one main goal for the gallery before the event
- Assign one gallery owner and one photo lead
- Set photo rules early, including notice, opt-out, and removal steps
- Build and test the QR code, gallery link, and slideshow on iPhone and Android
- Place signs where people stop, like check-in, coffee, and session doors
- Prompt guests during key moments so uploads don’t stall
- Review and sort files fast, ideally within 24 hours
- Split the final photos into two sets: one for guests and one for internal use
A few numbers stand out. The article points to 5–10 shot list items, 60–90 minutes for pre-event checks, 5–7 seconds per slideshow image, and a 3–5 business day window for removal requests. Those small details help avoid confusion on event day.
If I were setting this up, I’d treat it like a simple handoff system: make uploading easy for guests, keep control with one owner, and decide the photo rules before anyone scans the code.
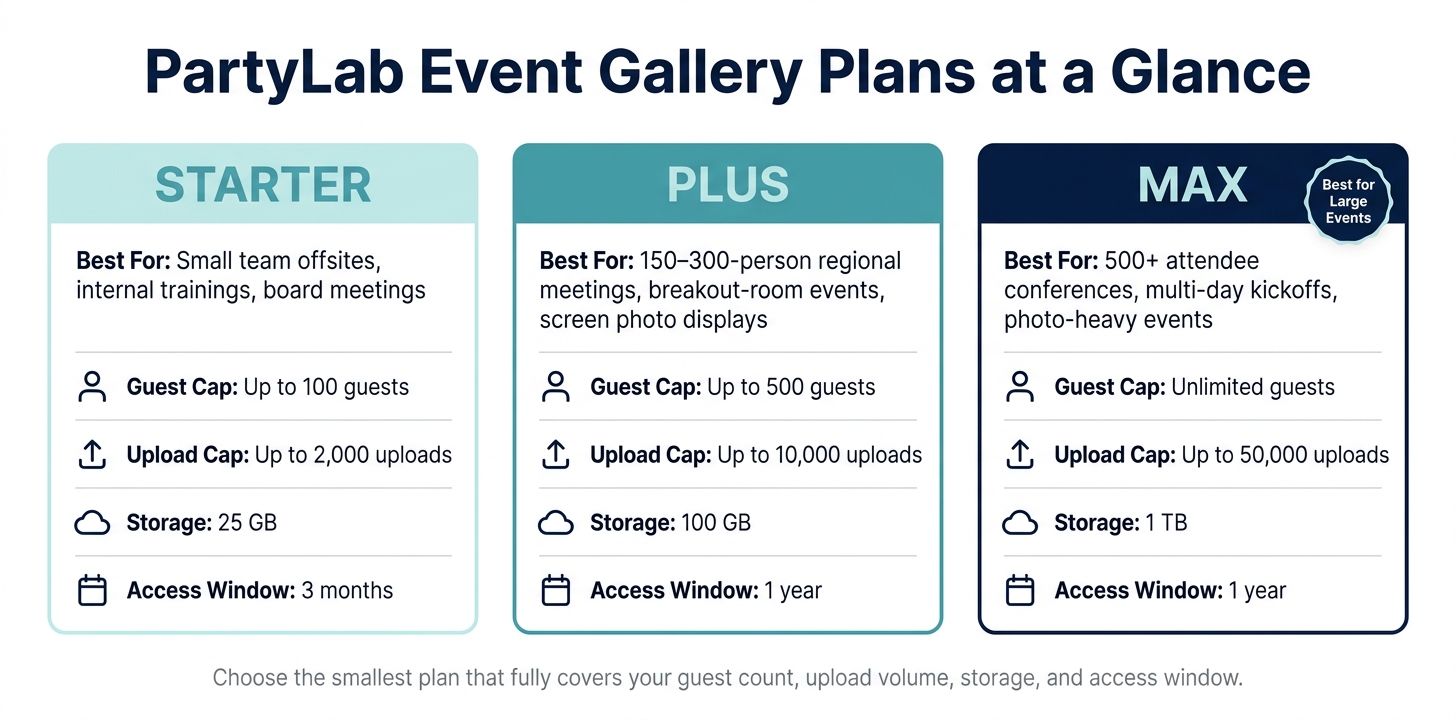
PartyLab Event Gallery Plans: Starter vs Plus vs Max
1. Define goals, ownership, and photo permissions
Choose the main purpose of the gallery
Before you do anything else, write one sentence that explains what the gallery is for: internal recap, sponsor reporting, recruiting, or marketing.
That one line does a lot of work. It keeps uploads on track, makes sorting easier after the event, and helps the team decide what photos matter most. It also shapes access rules.
For example, a gallery meant for sponsor reporting should focus on branded signage, sponsor booths, product demos, and clear logo placement. A gallery meant for recruiting should lean into candid shots of diverse teams, approachable leaders, and behind-the-scenes moments that show company culture.
Pick one primary purpose ahead of time. Then build a 5–10 item shot list around that goal so the photo point person knows what to focus on.
Assign one gallery owner and one photo point person
Once the gallery purpose is set, assign two clear roles.
- The gallery owner handles setup and access.
- The photo point person handles uploads, guest questions, AV coordination, and moderation during the event.
Don’t hand this off to someone who is also managing registration or speaker logistics by themselves. That’s asking for trouble. Give it to someone who is comfortable with basic tech and has enough authority to work with vendors and make calls in the moment, like stopping the slideshow if something inappropriate shows up.
Set permission, privacy, and sharing rules before the event
Decide early if the gallery is internal-only or if it may be used outside the company. Those two paths need different consent steps and different moderation workflows.
Internal-only galleries usually need simpler permissions and tighter access controls. Galleries that may appear on the company website, LinkedIn, or in recruiting materials need clear notice and, when promotional content uses identifiable people, written consent.
Clear rules cut down on hesitation during uploads and help you avoid access issues later.
Add photo notice language to the registration page and confirmation email. Then back it up with signage at check-in. At the event, give attendees a simple way to opt out, such as a distinct badge or a direct contact for the photo point person.
Set your content removal process before day one too. That should include:
- a dedicated email address
- a 3–5 business day response window
- a clear note that published materials may not be removable after posting
When these rules are written down ahead of time, the team can respond the same way every time if a guest objects later, instead of making rushed decisions on the spot.
Once goals, ownership, and permissions are in place, compare photo sharing methods to finalize your gallery setup and QR code flow.
sbb-itb-46c9b96
2. Set up the PartyLab gallery and QR code flow
With goals and permissions locked in, the next step is to size the gallery and QR flow for the event you’re running. The idea is simple: give guests an easy way to upload, while making sure the plan can handle the crowd, the file volume, and the time you need the gallery to stay live.
Pick the right PartyLab plan for your event size
Start with a rough estimate. Look at your guest count, how many uploads each person might add, and whether those uploads will be photos, video, or both. Then choose the smallest plan that still covers your headcount, upload volume, storage, and access window.
| Plan | One-time price (USD) | Guests | Uploads | Storage | Maximum file size | Upload and download access |
|---|---|---|---|---|---|---|
| Starter | $44.99 / event | Up to 100 guests | 2,000 | 25 GB | 250 MB | 3 months |
| Plus | $89.99 / event | Up to 500 guests | 10,000 | 100 GB | 500 MB | 1 year |
| Max | $179.99 / event | No guest cap | 50,000 | 1 TB | 1 GB | 1 year |
If your event sits near a limit, don’t guess. A meeting with 250 guests sounds like a Plus fit, but if people are likely to post lots of short videos all day, you’ll want to check storage and upload totals too.
Choose the smallest plan that fully covers your guest count, upload volume, storage, and access window.
Create the gallery with clear, branded settings
Once permissions are set, make the gallery look official and keep access rules steady across the team. Use the official event name exactly as it appears on invitations and calendar holds. Keep the date and time in U.S. format, such as August 25, 2026, and show session times in 12-hour format like 4:00 PM – 7:30 PM CT.
Upload a high-resolution primary logo in transparent PNG format, ideally 1,000–2,000 px wide, and enter your brand hex codes directly. On the gallery home page, less is more. Stick to the event title and date, one short line telling guests to add their photos, and a clearly labeled upload button.
Turn on web uploads so guests can scan the QR code and land right on the upload page. No account. No app download. No extra friction.
Set uploads to open access, but keep export and admin tools limited to the gallery owner and approved organizers. If your company needs tighter control, add a simple gate, such as:
- a company email domain
- an event code
- a consent checkbox
That keeps the upload path easy without leaving the door wide open.
Generate the QR code, event link, and display tools
PartyLab creates a unique QR code and short event URL as soon as you build the gallery. Download the QR code as a PNG or SVG for print use. Make sure the short link is easy to type, then test both the QR code and the short link on mobile and desktop before sharing anything out.
For print sizing, use 1.5–2 inches for table tents and 3–4 inches or larger for posters and screens. Give the code enough white space around it so phones can scan it without a fight. Also print the short URL next to the code for guests who prefer to type it in.
Before invitations go out, run a quick multi-device check. Scan the QR code on at least one iPhone and one Android phone using both venue Wi‑Fi and cellular. Upload a test photo and a short video, then confirm that both show up the right way in the live gallery and slideshow.
Test the slideshow on the actual screen setup too, whether that’s a TV, projector, or LED wall. Check that transition speed and autoplay work the way you want. This step matters more than people think. A slideshow that looks fine on a laptop can act very different once it hits the room display.
For slideshow settings, decide before the event whether you’ll show all uploads or only moderation-approved content. If company policy limits sharing, turn off public downloads and note that choice in your internal event brief so everyone on the team follows the same rule.
That way, when guests arrive, the flow is dead simple: scan, upload, done.
Next, write guest instructions and test the full upload flow before event day.
3. Prepare guest instructions and test before event day
Write simple upload instructions for email, signage, and slides
Make the upload process clear in a few seconds. Once the gallery is live, the guest path should feel fast, obvious, and easy to follow.
Keep the instructions to these four plain steps:
- Open your camera.
- Point it at the QR code.
- Tap the link that appears.
- Add your photos or videos and tap Upload.
Use the exact same four steps in email, signs, and slides. The photo point person should reuse the same wording everywhere. When people see the same message more than once, they tend to follow it without stopping to think.
Repeat "No app needed - just your browser" on every sign, email, and slide. Have the host or emcee say it out loud when introducing the gallery.
Add one short line about why the gallery matters. For example, say that you're building one shared album for the team , similar to how you would manage holiday party photo sharing and that uploads may appear on the event screens during the event.
Place QR signage where guests naturally stop
Put signs in places where guests already pause, look around, or pull out their phones. That's the sweet spot.
| Location | Best Format |
|---|---|
| Registration / check-in desk | 18×24 in poster |
| Coffee station or bar | 4×6 in or 5×7 in table tent |
| Buffet or food area | 4×6 in or 5×7 in table tent |
| Networking lounge / high-top tables | 5×5 in card |
| Session entrances / breakout room doors | 11×17 in or 18×24 in poster |
| Photo backdrop | 18×24 in poster at eye level |
For larger events, plan for at least one large sign in each major zone and a few table tents for each cluster of tables. Print QR codes in high contrast, with a dark code on a white or light background. Skip glossy laminate directly over the code, since glare from event lighting can make scanning harder. Always print the short event URL next to the code for guests who'd rather type it in.
Run a full test on phones, Wi-Fi, and slideshow screens
Do this at least one day before the event. The photo point person should stand where guests will stand, scan the actual printed QR code, and finish a full upload. Check that the link opens the right page, uploads go through, and the gallery works the way it should under venue conditions.
Test the venue screen setup by connecting the slideshow device to the actual display, whether that's a TV, projector, or LED wall. Then time how long it takes for a new upload to appear. Make sure portrait and landscape images show correctly without awkward cropping. Also check that transition speed and autoplay behave the way you want.
For Wi-Fi, test the same network guests will use and upload from different spots around the venue. If one area has a weak signal, ask the venue to add coverage or set up a backup plan. Make sure there's no Wi-Fi login screen that interrupts the upload flow. Add a few starter photos before guests arrive so the screen looks active instead of empty.
Once this flow is tested, move to event-day monitoring and moderation.
4. Event-day checklist
Once setup is tested, switch into live mode: final checks, simple guest prompts, and steady moderation.
Before doors open: confirm signs, links, and gallery access
Start 60–90 minutes before doors open. Check that every QR sign is easy to scan from 6–10 feet away. Then test again on guest Wi‑Fi using one iPhone and one Android. Make sure the code opens the gallery directly, uploads go through, and the slideshow is live.
| Component | What to Check |
|---|---|
| QR signs | Visible and readable from 6–10 ft; dark code on light background |
| Guest network | Scan and upload from guest Wi‑Fi, not staff network |
| Gallery status | Open and accepting uploads |
| Control device | Owner access active; moderation view accessible |
| Slideshow screen | Connected via HDMI or wireless; displaying the live gallery |
During key moments: prompt guests and monitor uploads
Guest prompts work best when they feel like part of the event flow, not a separate announcement.
Use short prompts during natural transition points.
| Event Phase | Who Prompts | What to Say |
|---|---|---|
| Check-in | Registration staff | "Scan the QR on the desk to add your photos to our event gallery - no app needed." |
| Opening remarks | Emcee | "We have a live photo wall running today. Scan the QR on your table and upload your shots - you'll see them on screen in minutes." |
| Group activities / breakouts | Facilitator | "Before we switch groups, grab a quick photo and upload it via the QR code on your table." |
| Awards or recognition | Emcee | "If you're capturing our award winners, please upload your best shots to the gallery so the whole team can see them." |
| Networking / happy hour | Floor staff | Point out nearby QR signs casually as guests move around. |
Have one photo point person watch upload count and recent thumbnails on a dedicated device. If uploads start to dip, ask the emcee for a short reminder at the next transition.
For events with 100+ guests, a good rule of thumb is at least one or two uploads per table per major segment. It’s a simple way to tell if the gallery is getting momentum or if people need another nudge.
Keep moderation and slideshow display running
Once uploads begin, keep the gallery active in real time.
Assign one person to review new uploads during the event. Approve good photos fast. Remove anything off-brand or inappropriate. If something sits in the gray area, like a whiteboard photo with internal data, move it to a hidden album for later review. Keep all moderation behind the scenes, and never announce removals.
Place the slideshow near coffee stations or break areas, where people naturally pause and look up. Set each image to stay on screen for 5–7 seconds.
5. Moderate, organize, and share the gallery after the event
Once the event wraps, the gallery needs a quick cleanup and a clear home. As soon as live moderation ends, shift into review and sharing mode. If you handle that first pass within 24 hours, a messy stack of guest uploads turns into a library your team can use without digging through junk.
Review, clean up, and export original files
Review the gallery within 24 hours. Remove obvious duplicates, blurry shots, off-brand content, and anything that exposes sensitive details, such as badge numbers, whiteboards, slides, or other confidential background items. Have one person handle the review so the cleanup stays consistent from start to finish. Flag the best images for later use so your team can find them fast when it's time to build recaps or pull assets. This is especially useful for seasonal events like office holiday parties where quick turnaround is key.
Then download the approved files as a ZIP archive. Keep the file names and upload timestamps unchanged. Save the archive in your company drive or asset library, and label the folder with the event name and date.
After cleanup, export the archive and sort the strongest images into separate sets based on who needs them.
Create separate versions for guests and internal teams
Not every photo belongs everywhere. The guest-facing gallery should feel simple, upbeat, and easy to browse. Your internal version should be smaller and more selective, built for leadership recaps, internal newsletters, sponsor reports, or marketing review.
| Aspect | Guest gallery | Internal team version |
|---|---|---|
| Audience | Attendees and invited guests | Leadership, marketing, HR, sponsors |
| Content | Broad highlights | Curated, business-relevant set |
| Privacy | Stricter removal of sensitive material | Still controlled, but may include more context |
| Use case | Memory-sharing and attendee engagement | Recaps, promotion, reporting, archive |
For any image marked for marketing, add a short usage note like "Internal use only" or "External use approved." That small label saves time later and cuts out the back-and-forth over what can go public.
Send the follow-up and note lessons for next time
Once the archive is saved, send the gallery link and close the loop with attendees. Keep the note short. Thank them, share the link, and spell out how long access will stay open and how the photos may be used. If uploads will remain open for a short final window, say that in the same message. If people can ask for a photo to be removed, include a real email address they can use.
After the follow-up is out, take a few minutes to write down what happened while it's still fresh. Note what worked and what slowed the team down: whether guests understood the upload flow, which QR sign placements got the best response, whether Wi-Fi caused problems, whether moderation took more time than planned, and whether the slideshow display led to more uploads. Save that short debrief in the event folder.
FAQs
How many QR signs do I need?
For most corporate events, put QR codes in high-traffic areas where guests naturally stop for a moment. Good spots include the registration desk, dining tables, the bar, and conference rooms.
For larger or seated events, placing a QR code at every table usually works best because people can see it without having to look around. However many codes you use, keep them at eye level in places guests will walk past, and back them up with one short verbal announcement.
What if venue Wi-Fi is unreliable?
You can still collect guest photos even if your setup runs on cellular data. Uploads happen in a standard mobile browser, so guests don't need an app or account. That means they can still use it even when they're not on the venue's Wi-Fi.
To cut down on upload problems, leave the upload window open for 48 to 72 hours after the event. That gives guests time to upload later from a stronger, more stable connection. Also, test the setup at the venue ahead of time.
Who should approve photo removals?
The event organizer - or a designated photo point person - should approve any photo removals.
As the host, you control the gallery. That means you can manage what stays visible and make sure shared photos follow company privacy rules, such as hiding office locations or internal products that shouldn’t be shown.