
How to Collect Guest Photos at a Wedding
The best way I’ve found to collect wedding guest photos is simple: use one browser link, put the QR code where people already stop, remind guests 2–3 times, and keep uploads open for 1–2 weeks after the wedding.
If I want more than the photographer’s set, I need a plan that guests can use in seconds. That means:
- No app (unlike The Knot or WeddingWire)
- No account
- One upload page
- Clear QR signs
- Short follow-up reminders
- One person in charge of downloads
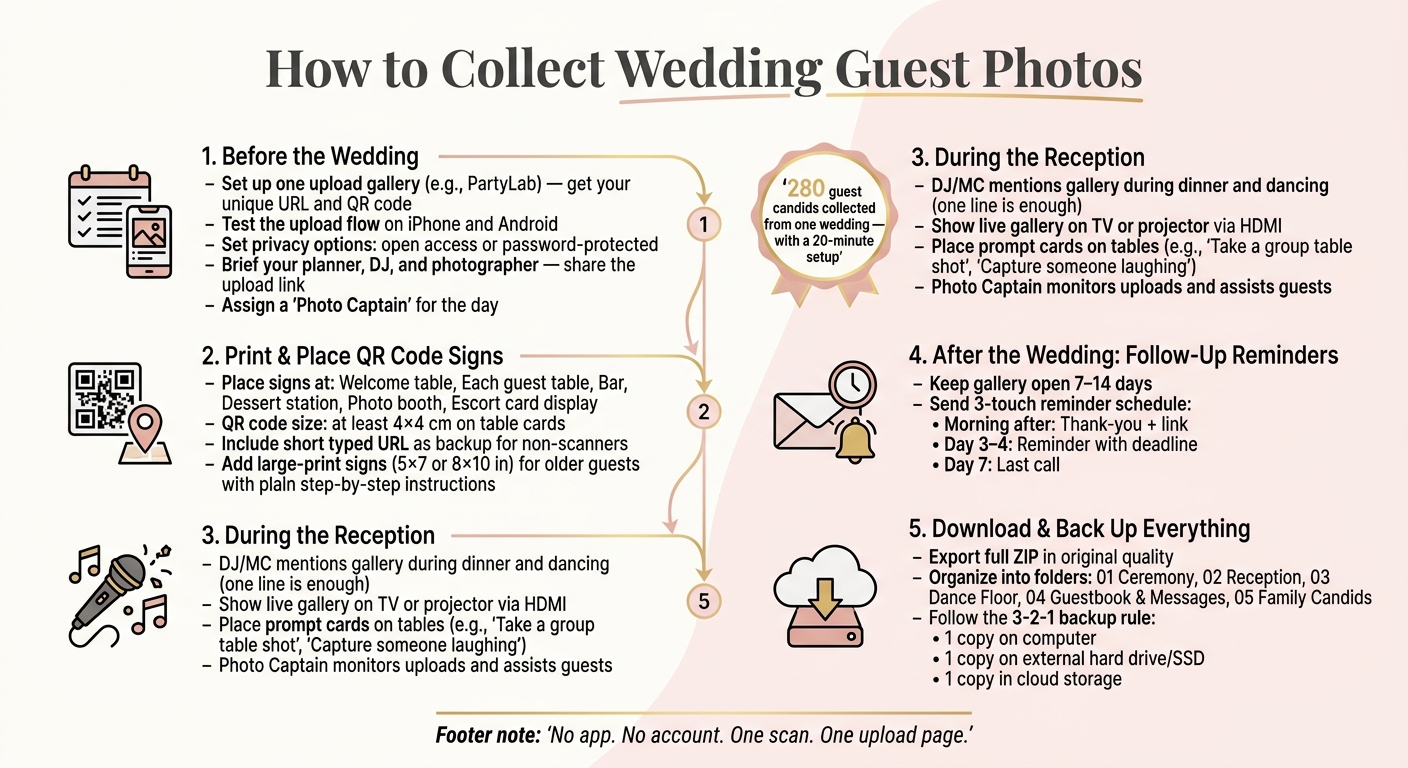
Guest photos often fill in the parts a photographer may miss, like bar photos, table shots, and late-night dance floor moments. And a short setup can lead to a large batch of extra images - one quote in the article mentions 280 guest candids from a single wedding.
Here’s the full playbook I’d use:
- Set up one gallery before the wedding
- Test the link on iPhone and Android
- Choose whether the gallery is open or password-protected
- Put QR codes on tables, at the bar, near the photo booth, and by the welcome area
- Ask the DJ or MC to mention it during dinner and dancing
- Show a live gallery on a TV or projector if the venue allows it
- Add a typed URL for guests who don’t want to scan
- Leave the gallery open for 7–14 days
- Download and back up the files in 3 places
What matters most is not fancy setup. It’s whether guests can use it fast, with one scan and a couple of taps. That’s what gets photos off phones and into one place.
How to Collect Wedding Guest Photos: Step-by-Step System
How To Create a QR Code To Share Wedding Photos (Step By Step)
sbb-itb-46c9b96
Set Up Your Photo Collection System Before the Wedding
Getting your photo collection system ready a few weeks before the wedding saves you from a last-minute rush. Set up one upload destination and use it everywhere.
Create a PartyLab event and test the upload flow
Start with the upload page, then build the rest around it. Create your wedding event with a clear name and date. PartyLab gives you a unique URL and QR code right away.
If you want guests to add a short note with their photos, turn on the digital guestbook. That adds a simple message field to the upload screen, with a prompt like "Share your favorite memory with us."
Before you print anything, test the whole flow on a few phones. Scan the QR code on both iPhone and Android, then make sure uploads show up in the gallery. It also helps to try a few different devices so you can catch browser issues early. When everything works as expected, finalize your QR code graphics and send them to print.
Set your privacy, viewing, and download options
Two choices matter most here: who can view the gallery and who will download the files after the wedding.
You can choose open access for ease or add a password for more privacy. An open gallery keeps things simple. Guests scan, upload, and can see other photos appear in real time, which often leads to more uploads. If you prefer a password, keep it short and easy to remember, then print it discreetly next to the QR code on your signs.
Also, pick one person to export the files after the wedding. PartyLab's paid plan comes with a one-click ZIP export, so have that person handle the download soon after the event.
With privacy and exports sorted out, the next job is making sure guests actually see the link.
Brief your planner, DJ, and photographer ahead of time
Your vendors help keep the photo system visible all day. Once your PartyLab event is final, send the upload link and a sample QR sign to your planner, DJ, and photographer. Include a short explanation: "Guests scan this code to upload photos from their phone, no app needed."
Ask your DJ or MC to mention the gallery during dinner, toasts, and open dancing. It doesn't need to be a big speech. Something like "Scan the QR code on your table to upload photos" does the job. Ask your planner to make sure signs are in place and easy to spot, and to help any guests who seem confused during cocktail hour.
"I set it up in 20 minutes and we collected 280 guest candids that we never would have gotten otherwise." - Madison T., Bride
It also helps to assign your planner or a tech-comfortable friend as the photo captain for the day. Give one person the job of watching uploads during the reception and fixing small issues fast. After setup, the focus shifts to keeping the gallery active during the reception and after the wedding.
Place QR Codes, Links, and Signs Where Guests Already Have Their Phones Out
With the event live and vendors briefed, put upload prompts where guests naturally pause.
Design QR code signs and table cards with short instructions
Use simple copy: "Scan to share your photos - no app needed." For table cards, this version also works well: "Help us capture the day - scan to upload your photos and videos."
Keep the design clean. Use dark text on a white or very light background, and make the QR code big enough to scan from a normal seated distance - ideally about 4×4 cm on a table card. Stick to one easy-to-read font and skip decorative scripts when creating your wedding gallery. They may look nice, but they slow people down. In most cases, you only need three things: the QR code, a short headline, and one brief instruction line.
Before printing, test the code in the same kind of conditions guests will deal with: sitting at a table, standing at the bar, and under dim reception lighting. Check readability from a seated distance and in low light. It also helps to hand the sign to someone who isn't very comfortable with tech and see where they pause.
Where to place upload signs around the venue
The aim is simple: reach guests when they already have their phones in hand. Good spots include:
- The welcome table
- The escort card display
- Each guest table
- The bar
- The dessert station
- The photo booth
- Any area where guests tend to linger
Near the photo booth, uploads feel especially natural because people are already taking photos.
When to remind guests to upload during the reception
Signs handle most of the heavy lifting, but a short verbal reminder at the right moment can lead to more uploads. The two best windows are after dinner, when guests are settled and checking their phones, and once dancing starts, when candid moments happen fast and people are more likely to share.
The MC or DJ doesn't need to turn it into a whole announcement. One line is enough: "If you've captured any fun moments tonight, scan the code on your table to upload them - no app needed." Later, during dancing, an even shorter reminder works: "If you snapped a great candid, we'd love it in the wedding gallery." A couple of reminders during the night is enough. More than that starts to feel like an interruption.
Once the signs are in place, use a live gallery or guestbook prompt to keep uploads flowing.
Get More Photos with a Live Gallery, Digital Guestbook, and Backup Options
Show a live PartyLab gallery or slideshow during the reception
Once guests know where to scan, the next step is making uploads feel instant. A live PartyLab gallery on a screen does exactly that. When someone sends a photo and sees it pop up on a big display a few seconds later, the gallery stops feeling like a side task and starts feeling like part of the party.
Connect a laptop to a TV or projector with HDMI, then open your PartyLab gallery in full-screen slideshow mode. Put the screen where people already tend to gather, like near the bar, dance floor, or cocktail area, but keep it out of the way so it doesn’t clog foot traffic. It also helps to keep a laptop or tablet nearby so someone can watch uploads and remove accidental ones. If you’re using separate albums for the ceremony and reception, switch between them as needed.
One small thing that matters a lot: check with your venue ahead of time about Wi-Fi. If the signal is weak in the reception space, plan to use a phone hotspot instead.
Add digital guestbook messages and photo prompts
Photos are great on their own. A short note next to them can make them even better years later.
Let guests add a short message with each upload by turning on caption and message fields. That gives people a simple way to leave a note for the newlyweds or share advice for the first year of marriage right alongside their pictures.
If you want better variety in the gallery, put small printed prompt cards on each table. Specific prompts usually work better than vague requests. For example:
- A full table group shot
- A candid photo of someone laughing
- A photo with the couple
- Your best dance move
A mix of sweet prompts and playful ones tends to work well. It helps you get photos from all parts of the day instead of 50 versions of the same dance floor shot.
Help older guests and less tech-comfortable family members upload
Not everyone wants to scan a QR code, and that’s fine. A few backup options can make a big difference.
Print larger signs in 5×7 in or 8×10 in with high contrast and plain instructions such as "1. Open your camera. 2. Scan the code. 3. Tap to upload." Keep the wording simple and skip tech terms.
Also add a short typed URL to every sign, so guests who’d rather type than scan still have an easy path. And if you can, ask one or two tech-savvy people in the wedding party to make the rounds and help guests upload when needed.
Keep the Gallery Open After the Wedding and Download Everything
Send follow-up reminders in the first week after the wedding
Once the reception ends, leave the gallery open so guests can add the photos still sitting on their phones. Keeping uploads open for 1–2 weeks gives people time to share the shots they meant to send but forgot about in the rush of the night.
A simple three-touch reminder schedule works well without coming off as pushy:
- Morning after: thank-you + link
- Day 3–4: reminder with deadline
- One week: last call
If some guests had trouble uploading during the event, invite them to reply to the reminder email with photo attachments. A family member can add those files to the gallery, which keeps the full set in one place instead of scattered across inboxes and text threads.
After the last reminder goes out, download the full set before your package’s access window ends.
Export your files and sort them into folders
Before your package’s download access ends, use PartyLab's ZIP export to download everything in original quality in one step. Unzip the folder on your laptop, then set up a simple folder structure: 01 Ceremony, 02 Reception, 03 Dance Floor, 04 Guestbook & Messages, 05 Family Candids. Those leading numbers keep everything in time order in almost any file browser.
Inside each folder, add two subfolders: "Favorites for Album" and "Favorites for Thank-You Cards." Then copy your selected images into them. That way, your full set stays untouched, and you still have a short list ready to use.
For long-term safety, follow the 3-2-1 backup rule:
- one copy on your computer
- one on an external hard drive or SSD
- one in cloud storage
Guest photos should be treated the same way as your professional photos in your backup plan. They matter just as much.
Conclusion: The best wedding photo system is the one guests will actually use
With everything downloaded and backed up, the last piece is keeping the process simple for guests. The best wedding photo system is the one people can use fast, with no app and no account. A single browser-based upload link, QR codes placed where guests already stop, short reminders at the right moments, and a follow-up message the next morning can turn a scattered pile of phone photos into one complete archive you'll come back to when it's time to make an album, write thank-you cards, or share memories with family years later.
FAQs
How do I get more guests to actually upload photos?
Make uploading feel effortless. Add QR codes to table cards, menus, or programs so guests can open the upload page right in their mobile browser - no app, no account, no hassle.
It also helps to mention it once during your welcome speech. Keep it short and simple, then back it up with signs that say Scan to share your photos.
If you can, run a live slideshow too. When guests see photos pop up in real time, they’re much more likely to join in and keep sharing.
Should I use an open gallery or a password?
For the best photo collection, skip the password. Asking guests to create an account, download an app, or enter a password adds extra steps, and those extra steps can turn people away.
A simple, open upload link that guests can reach by scanning a QR code in their phone’s browser makes sharing easy. And when sharing feels easy, you’re more likely to get more candid wedding photos.
What if some guests don’t want to scan a QR code?
If guests seem a little unsure about scanning a QR code, the good news is that the process is still easy. There’s no app to download, no account to create, and no login required.
Guests just point their smartphone camera at the code, and the upload page opens right in their browser. From there, they can share photos in a few taps.
It also helps when the host or MC gives a short, friendly heads-up. A simple note that the link is only for photo sharing and doesn’t ask for personal information can help guests feel more at ease.