
How to Set Up a Live Photo Gallery for a Party
You can set up a live party photo wall in one short prep session: make the gallery, print the QR code, test uploads on Wi-Fi, and put the slideshow on a TV or projector. In most cases, guest photos show up in 5 to 15 seconds, while videos may take 1 to 3 minutes.
If I wanted this to work without stress, I’d focus on four things first:
- Turn on guest uploads so people can send photos from their phone browser
- Place QR codes at the entrance, bar, tables, and restrooms
- Test the full setup on the same internet connection before the event
- Back up the files after the party in at least two places
A few details make a big difference. I’d keep the display device plugged in, use HDMI for the screen, aim for at least 10 Mbps upload speed, and run one test from both iPhone and Android before guests arrive. For signs, 8.5 x 11-inch prints work well in busy spots, and small table cards help keep the upload link close by.
If I needed to pick a PartyLab plan fast, this is the part I’d look at first:
| Plan | One-time price (USD) | Guests | Uploads | Storage | Maximum file size | Upload and download access |
|---|---|---|---|---|---|---|
| Starter | $44.99 / event | Up to 100 guests | 2,000 | 25 GB | 250 MB | 3 months |
| Plus | $89.99 / event | Up to 500 guests | 10,000 | 100 GB | 500 MB | 1 year |
| Max | $179.99 / event | No guest cap | 50,000 | 1 TB | 1 GB | 1 year |
Bottom line: a live gallery works best when the setup is simple, the QR code is easy to spot, and the internet has already been tested before party day.
Displaying photos in realtime at your event with LiveWall
sbb-itb-46c9b96
How to Create Your PartyLab Gallery and Share It With Guests
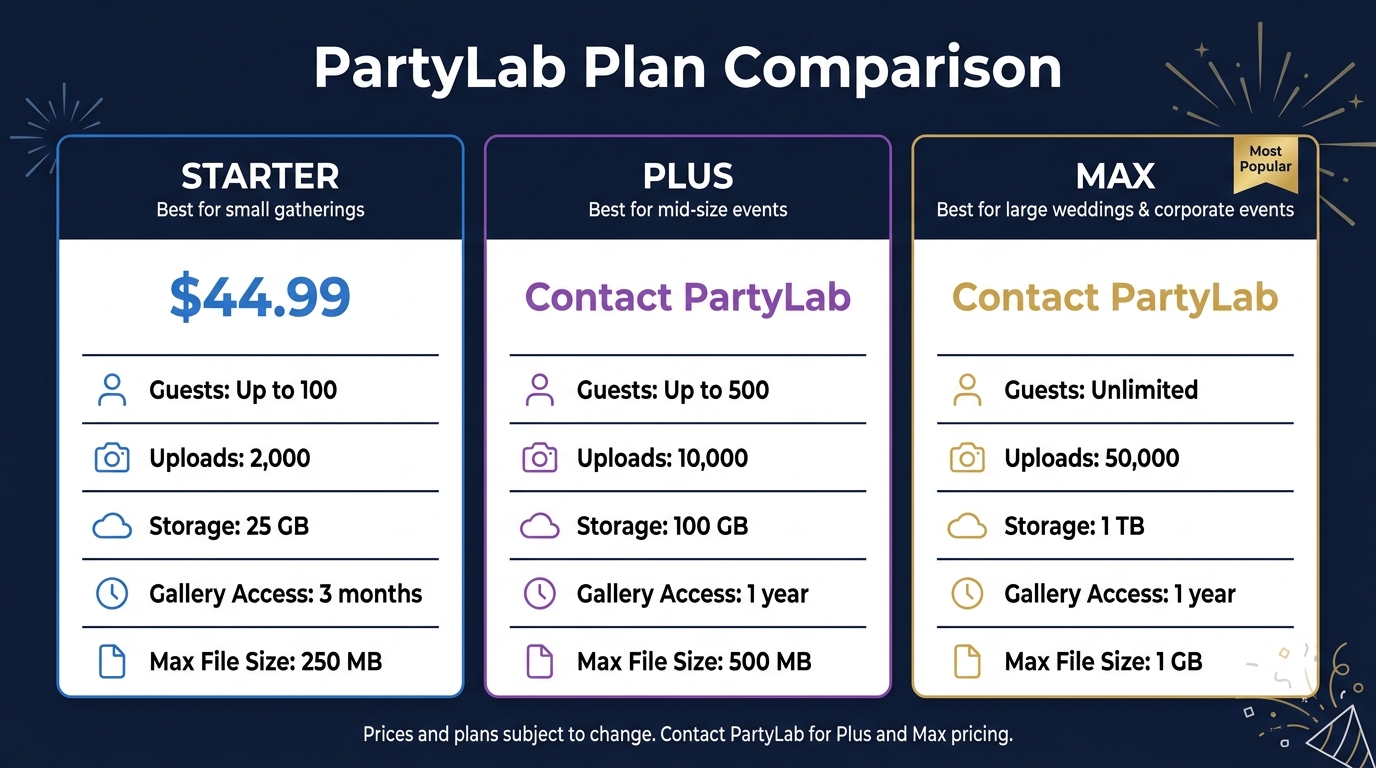
PartyLab Plan Comparison: Starter vs Plus vs Max
With your event page ready, the next step is to set up the gallery and sharing options. Create a new event, give it a name, and enter the date in MM/DD/YYYY format.
Set up the event page, upload rules, and live gallery settings
PartyLab supports JPEG, PNG, HEIC, and WebP for photos, plus MP4 and MOV for videos. That means guests can upload straight from their phone browser without stopping to convert files first.
To make things easy, turn on guest uploads without accounts so people don't need to sign up or log in. If you want photos and videos to show up as they're added, enable the live gallery. You can also switch on slideshow mode so the feed is ready to display on a screen as soon as the party begins.
PartyLab also lets you turn on the digital guestbook and reactions. Those are nice extras if you want more back-and-forth from guests, but they're optional.
Generate the QR code and shareable event link
After you save your settings, PartyLab automatically creates a unique QR code and a browser link for your event. Send the link by text or email before the party so guests have it on hand.
Then download the QR code and add it to a sign template. For U.S. events, 8.5 x 11-inch signs work well in busy spots like the entrance or bar. It's also smart to print smaller table cards for every 8 to 10 guests. That way, there's always a code nearby, no matter where people are sitting.
Choose the right PartyLab plan for your event size
Pick a plan based on your guest count and how much storage you'll need.
| Plan | One-time price (USD) | Guests | Uploads | Storage | Maximum file size | Upload and download access |
|---|---|---|---|---|---|---|
| Starter | $44.99 / event | Up to 100 guests | 2,000 | 25 GB | 250 MB | 3 months |
| Plus | $89.99 / event | Up to 500 guests | 10,000 | 100 GB | 500 MB | 1 year |
| Max | $179.99 / event | No guest cap | 50,000 | 1 TB | 1 GB | 1 year |
Next, test uploads, moderation, and the screen setup before party day.
How to Set Up Your Tech Before Party Day
Before party day, test the whole setup from end to end: power, internet, QR code, uploads, and the screen. Start with the display, then do one full test upload from a guest phone to the gallery.
Test your internet, devices, and guest upload flow
Keep the host device plugged in for the entire event. A battery usually won’t make it through a full party. Connect that device to your TV or projector with an HDMI cable. If you’re using a laptop or tablet, you may also need a USB-C to HDMI adapter or another adapter that fits your device.
Use the same network you plan to use at the party, and keep a mobile hotspot ready as a backup.
The day before, run a quick 2-minute test. Scan your PartyLab QR code from both an iPhone and an Android phone, then upload one photo from each. Make sure the photos appear in the gallery and show up on your display screen.
That small test can save you a headache later. It helps you spot browser issues, slow uploads, or device hiccups before guests walk in.
Set moderation, privacy, and gallery organization options
PartyLab keeps your gallery unlisted by default, so only people with the QR code or link can get in.
For most casual parties, instant display is enough. Photos appear as soon as guests upload them. If you’re running a wedding or any event where you want to check images before they hit the big screen, switch to host approval and give one trusted person moderator access on their phone. They can approve photos in real time before anything appears on the main display.
Pick the best screen setup for your venue
Your screen setup should match the room, the lighting, and the gear you already have. Here’s a simple look at two setups that tend to work well at U.S. events:
| Setup | Required Hardware | Pros | Cons | Best For |
|---|---|---|---|---|
| Laptop + TV | Laptop, HDMI cable, TV | Most reliable; easy to manage moderation on the same device | Cable limits screen placement | Living room parties, indoor birthdays |
| Laptop + Projector | Laptop, HDMI cable, projector (3,000+ lumens) | Massive display size; high visual impact | Needs dim lighting; more cables to manage | Wedding receptions, large banquet halls |
One small placement move can make a big difference: put the screen at eye level or a little higher, keep it away from windows so glare doesn’t wash it out, and place it near one of your QR code signs. When guests see their photos pop up right away, they’re much more likely to upload more.
Once everything works in test mode, you’re set to run the gallery live during the party.
How to Run the Live Gallery During the Party
With your screen set up and your QR codes posted, the gallery is pretty easy to run during the party. Most of the work happens before guests arrive. After that, you just get the slideshow on screen early and let people jump in.
Open the PartyLab slideshow on a TV or projector
Open your PartyLab event slideshow in Google Chrome and switch it to full screen. Make sure the gallery is open on the device already hooked up to the TV or projector. New uploads show up on their own within seconds, so you don't need to refresh the page manually.
Video uploads can take a bit longer. In most cases, they appear within 1 to 3 minutes because they need extra processing first. Once the gallery is live, keep it visible and easy to notice so guests remember to add their photos.
Make uploading easy for guests throughout the event
Put QR code signs in spots people already pass by, such as:
- the entrance
- the bar
- tables
- restrooms
Add a short prompt under each code, like "Scan to add your photos - no app needed."
It also helps to have the DJ or MC mention the gallery two or three times during the night, especially at the start, during dinner, or during another transition. When guests see their photos pop up in real time, they're much more likely to keep uploading.
Fix common live-event problems quickly
If uploads slow down or the screen stops updating, a few simple checks usually solve it fast.
For moderated galleries, approve uploads from your phone as they come in. If guests run into upload issues, the cause is often a slow or unstable internet connection. Ask them to switch to cellular data. If the display stops updating, check the internet connection and refresh the page to restore the gallery connection.
After the Party: Download, Organize, and Save Your Photos
Clean up the gallery and export original files
Once the party is over, it’s time to move from the live gallery to cleanup mode. Open your PartyLab dashboard and go through the uploads. Delete blurry photos, accidental uploads, and anything that doesn’t fit the event.
To speed things up, use reactions or likes to spot the best images first. That makes it easier to find the shots people cared about most. You should also export the digital guestbook at this stage, since captions and messages stay packed inside the ZIP.
When everything looks right, use PartyLab’s one-click ZIP export to download the full gallery in one go. The files keep their original quality, which matters if you want to print them later or store them for the long haul.
Share the final gallery and back it up before access expires
After cleanup, send the final gallery out again so guests can keep downloading their photos. Share the final gallery link with everyone. If you collected email addresses during the event, download the attendee list as a CSV and send the link directly by email.
Once you’ve downloaded the gallery, save it in at least two places:
- a cloud service like Google Drive or iCloud
- a physical external hard drive
One cloud copy and one external backup gives you a simple safety net if a file goes missing or a device fails.
FAQs
How many guests can upload at once?
These platforms work for events of all sizes, from small get-togethers to parties with hundreds of guests. There isn’t a fixed cap on people uploading at the same time because uploads happen in the browser, not through an app download.
In most cases, speed depends more on your local internet connection than on guest count. For bigger events, a strong Wi-Fi connection or mobile hotspot can help cut down on upload delays.
What if my venue Wi‑Fi is weak?
Weak venue Wi‑Fi usually won’t stop guests from joining in. Most people can upload photos with their own mobile data, whether that’s 4G or 5G. And if the connection cuts out for a moment, the browser-based platform will queue the upload and send it once service comes back.
The only device that needs a steady internet connection is the one running the live slideshow. If you want a simple backup plan, bring a mobile hotspot for the display.
Can I approve photos before they appear?
Yes. You can approve photos before they show up in your gallery or slideshow with the moderation feature.
When moderation is on, new uploads go into a review queue first. They stay there until you approve them, which gives you control over what appears on your display.
That can be a good fit for formal events where you want to screen each photo. For casual parties, automatic approval may be better if you want uploads to appear without slowing things down.