10 Ways to Get More Photos from Event Guests
Most guests will share photos if you make it easy, ask at the right time, and give them a simple reason to do it. That’s the whole playbook.
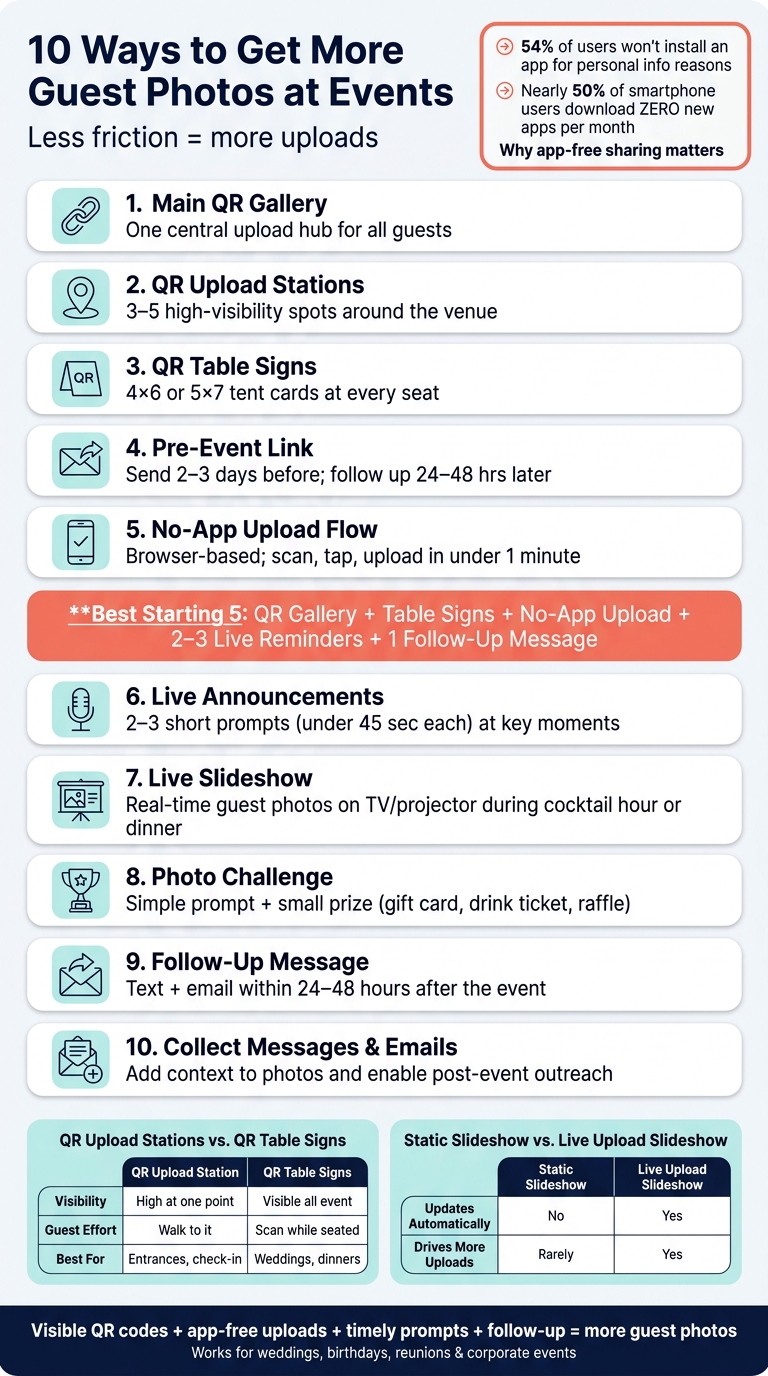
If I had to sum up the article in one line, it would be this: use one QR-code upload link, put it everywhere, remind guests during the event, show photos live, and follow up within 24–48 hours. That works because people do not want extra steps. The article also notes that 54% of app users have chosen not to install an app after seeing how much personal information it wanted, and nearly half of U.S. smartphone users download zero new apps in a month. So if sharing needs an app, login, or setup, many guests will stop.
Here’s the full list covered in the article:
- Use one main QR code gallery as the upload hub
- Put QR upload stations in high-traffic spots
- Add QR table signs where guests sit or stand
- Send the upload link before the event
- Use a browser-based, no-app upload flow
- Make short live announcements at key moments
- Show a live slideshow during parts of the event
- Run simple photo challenges with small prizes
- Send follow-up texts and emails within 24–48 hours
- Ask for short guest messages and email addresses with uploads
The main idea is simple: less friction = more uploads. Guests are far more likely to share when they can scan, tap, and upload in under a minute.
10 Ways to Get More Guest Photos at Events: Quick Comparison
Step-by-Step: Make a QR Code to Share Wedding Photos | QR Code Generator in Canva (Full Tutorial)
sbb-itb-46c9b96
Quick Comparison
| Tactic | What it does | Best time to use it | Main goal |
|---|---|---|---|
| Main QR gallery | Gives guests one place to upload | Before and during event | Keep sharing simple |
| QR upload stations | Makes the link easy to spot | During event setup | Get more scans in busy areas |
| QR table signs | Puts the link within reach | During event setup | Reach seated guests |
| Pre-event link | Gets guests ready early | Days before event | Make the link familiar |
| No-app upload flow | Cuts extra steps | Before launch | Lower drop-off |
| Live announcements | Reminds guests to act now | During key moments | Prompt uploads |
| Live slideshow | Shows guest photos on screen | Cocktail hour, dinner, breaks | Push more sharing |
| Photo challenge | Adds a fun reason to post | High-energy parts of event | Spur action |
| Follow-up messages | Brings in late uploads | 24–48 hours after | Get a second wave |
| Messages + emails | Adds context and contact info | During upload | Make follow-up easier |
If you want more guest photos, I’d start with these five: one QR gallery, signs on every table, no-app uploads, 2–3 live reminders, and one follow-up message after the event.
1. Use a PartyLab QR Code Gallery as Your Main Upload Hub
Give guests one clear place to send their photos. With PartyLab, you create an event and get a single QR code and link that sends guests to a shared gallery. They scan the code with their phone camera, and the upload page opens right in their browser.
That matters because there’s no app to download and no account to set up. Guests can just scan, open, and upload.
As photos start coming in, the live gallery updates in real time. You can also run it as a slideshow on a TV or projector during cocktail hour or dinner, which turns guest photos into part of the event itself.
PartyLab does more than collect photos, too. It includes a digital guestbook, so guests can add written messages to their uploads. It also has photo reactions, which let people like each other’s shots. And if you want to reach out after the event, there’s an optional email collection step during the upload flow.
The next move is simple: put that QR code somewhere guests will actually notice. For more inspiration, check out our event photo guides for specific occasions.
| Feature | What It Does |
|---|---|
| Browser-based upload | Guests upload from their phone browser without an app or account |
| Live gallery | Photos appear in real time as guests submit them |
| Built-in slideshow | Displays uploads on a TV or projector |
| Digital guestbook | Guests attach messages or well-wishes to photos |
| Photo reactions | Guests like or favorite each other's uploads |
| Guest email collection | Captures contact info during the upload step |
2. Set Up High-Visibility QR Code Upload Stations
Once guests have the upload link, put it where they can't miss it. The goal is simple: make sharing feel easy at every point in the venue. Place QR stations in spots where people naturally stop, especially the bar, plus the entrance, QR code photo booth, gift table, and dessert station. In a spread-out venue, 3–5 stations usually works well.
Each station should be easy to spot and fast to scan. Print the QR code large, with high contrast, so phones can read it without a struggle. Keep the sign text short. Scan to Upload Photos is enough. Set signs at eye level on easels or tabletop frames so guests see them without hunting around.
Lighting matters too. For evening events, place stations near existing light or add a small LED to each stand. A QR code that sits in a dark corner might as well not be there.
Before doors open, do one last walk-through. Scan every station yourself and make sure no sign is blocked, hidden, or hard to reach.
3. Put QR Table Signs Everywhere Guests Sit
Upload stations reach people as they pass by. Table signs reach the guests who stay put. That makes them the simplest way to get in front of people who never leave their seats.
Most guests already have their phones in hand. A small sign shows them exactly what to do next. They don’t have to recall a link or hunt for a station. One clear prompt usually leads to more scans.
Place one sign at every guest table. Then add extra signs at bars, cocktail tables, lounge areas, and the welcome table. If it’s a cocktail-style event with little seating, put more focus on high-tops and bar ledges where people naturally stop for a minute. The goal is simple: no guest should be more than one step away from a QR code.
Use 4 x 6 in. or 5 x 7 in. tent cards and set them just outside the centerpiece. For bars or buffets, an 8.5 x 11 in. sign on a small easel gives you more visibility.
Keep the wording short. "Scan to upload photos" is enough. Add a short URL under the QR code as a backup in case someone’s phone doesn’t scan well. And send the QR code straight to the gallery, so guests can scan and upload in a single step.
4. Send the Upload Link Before the Event Begins
Once your upload hub is ready, send the same link before guests arrive. A lot of people never upload photos for one simple reason: they didn’t get the link early enough. If they have it before the event, they can show up ready to use it.
Send the first message a few days ahead so guests have time to save it. Then send a follow-up 24–48 hours later to keep the link top of mind. Add it to places guests already check, like the final-details email, wedding website, group text, or calendar invite. It also helps to repeat that same link in two places so guests recognize it when they see it again at the event.
Keep the message short. Guests should know they can tap the link and upload from their phone anytime. You can also mention the kinds of photos they can share, like arrival shots, behind-the-scenes moments, and anything else worth saving.
Use that exact same upload link in every pre-event message. That way, guests can save it once and find it fast later.
Before you send anything, test the link on both iPhone and Android. When the QR code and upload page look familiar ahead of time, the whole thing feels much easier when guests see it at the event.
5. Pick an Upload Flow That Requires No App
Even if guests already have the link, the upload process still needs to feel easy. If it feels slow or too nosy, people drop off. comScore data shows that nearly half of U.S. smartphone users download zero new apps in a given month, and Pew Research found that 54% of app users had decided not to install an app after learning how much personal information it would require. Sometimes just one extra step - an app store prompt, a login screen, or a permissions request - is enough to make someone quit.
That’s why a browser-based upload flow works so well. Guests scan a QR code or tap a link, and the upload page opens right in their phone’s browser. No download. No setup. No detour. The same simple path works at every event, from weddings to holiday parties, and the whole thing can take less than a minute.
When you compare upload tools, focus on a few basics:
- A mobile-friendly layout
- Support for multi-photo upload
- A clear confirmation message so guests know their photos were sent
A page that loads fast on venue Wi‑Fi or cellular data will usually get more uploads than a feature-packed app people never open.
Once the upload flow is this easy, the next step is asking at the right moment.
6. Make Live Announcements at the Right Moments
Once the upload flow feels easy, the next step is simple: ask when people are already paying attention. Short spoken prompts from the host, MC, or DJ tend to work best at natural pauses in the event.
Good moments include welcome remarks, right after the ceremony, before toasts, during cake cutting, and when the dance floor opens. The exact timing should fit the type of event.
For most events, 2–3 short reminders is enough. For longer events, use 3–5. Keep each prompt under 45 seconds and stick to one clear action.
Each prompt should tell guests where to upload and what to upload. While the announcement is happening, point to the nearest QR sign or show the code on-screen.
Here are two ready-to-use script ideas:
- Before toasts: Take a second to share one candid from this moment. Scan the PartyLab QR code on your table and upload it to the gallery - it's what [couple/host] wants to see.
- During cake cutting: We're about to cut the cake. Snap a picture from your angle, scan the PartyLab QR code, and upload it to the gallery. Every shot helps [Name] remember this moment through your eyes.
Give your MC 2–3 scripted prompts tied to the event timeline, such as welcome, pre-toast, and cake cutting.
When guests hear that their photos may show up during the event, sharing starts to feel easier. There’s now a reason to act right away, not later.
7. Show a Live Slideshow of Guest Uploads During the Event
After the announcement, put those uploads on a live screen. A live slideshow gives you instant social proof. As guests use the best photo sharing apps to upload photos, new images show up on-screen automatically. Just connect a laptop to the venue TV or projector with HDMI and run the slideshow.
Once it’s live, timing and placement matter. Use the slideshow during cocktail hour, dinner, dancing, or networking breaks. Skip speeches and ceremony moments, where it can pull attention away. Set the screen where guests already tend to look, like near the dance floor, bar, or main stage. Then, at natural breaks, give people a short reminder.
To catch late arrivals, add one simple on-screen prompt:
Scan the QR code and upload photos - no app needed.
Before the slideshow goes live, turn on moderation so someone can approve photos first. That helps keep the screen appropriate without making the process feel slow. It’s also smart to load a few sample photos before guests arrive, just to check the layout and make sure the image fit looks right.
8. Run Simple Photo Challenges with Small Prizes
If your live slideshow is already turning heads, lean into it with a photo challenge. It gives guests a clear reason to post: one simple prompt, one easy way to submit, and one small prize.
Keep the prompt so simple that someone can get it in under 15 seconds. Good examples include Best candid of the couple, Best team photo, or Funniest dance move. Those prompts work for all kinds of events, including music festivals and concerts. They give people enough direction without boxing them in.
The prize doesn't need to be a big deal. In fact, small and instant tends to work best. You can offer:
- a gift card
- a drink ticket
- a raffle entry
- swag
- a photo booth perk
Even on-screen recognition can do the trick.
Use the same QR code gallery and place the challenge prompt right next to it. Put both on one sign so guests can scan and submit in a single step. No extra friction.
Announce the challenge during one high-energy moment, then mention it one more time before the deadline. Keep the tone light and playful, not stiff. And if someone misses it in the moment, that's fine - they can still upload later when you send the follow-up reminder.
9. Send Follow-Up Texts and Emails Within 24–48 Hours
After the event, follow up with guests who meant to upload later. Not everyone shares photos during the event. Some people are busy dancing, talking, or watching their kids. That’s normal. The 24–48 hour window is the sweet spot because the event is still fresh in people’s minds, and their camera rolls are packed with new photos. One reminder can bring in a second wave of uploads.
Keep the message short - just 2–3 lines. Thank guests, remind them what to share, and include a direct link to the same gallery they saw at the event. For example: Thanks for celebrating with us! If you took any photos or videos, please upload them here so we can add them to the event gallery. It only takes about 30 seconds. Use one direct link that opens on mobile and takes guests straight to the upload page.
A simple rhythm works well:
- Send a text first
- Send an email reminder within 24–48 hours
- If needed, send one more light nudge about a week later
Keep the tone warm and thankful. Two well-timed messages are usually enough to bring in late uploads. If you collected contact info during the event, use it for the follow-up.
It also helps to tell guests that late uploads are still welcome: "If you missed the party window, we'd still love your photos." That small line takes away pressure and makes it easier for people to send their photos later.
10. Collect Guest Messages and Emails Along with Photos
Once uploads are easy, ask for one more thing: a short note and an email.
A caption gives each photo context. When guests add who’s in the shot or what moment it shows, the image turns into a stronger record of the event. That extra detail also makes it easier to sort photos, credit the right people, and come back to the best moments later.
Be specific with the prompt. Asking who is in the photo or what moment it captures usually works better than dropping in a blank caption field. You can also add a sample line near the QR code so guests know what to write and keep it short.
“Emma and Luis during the first dance”
That kind of cue helps people move fast without overthinking it. And that matters. If the form feels long, people are more likely to stop mid-upload.
Collecting an email in the same step helps too. It gives you an opt-in way to send the final gallery, thank-you notes, and an event recap. If each upload is tied to an email address, you can credit guests later without digging through files by hand.
Keep the form short and mobile-friendly. Be clear about how you’ll use the information. A brief privacy note explaining that the photos will be used in a private gallery and recap, plus a separate opt-in for future updates, can help guests feel more at ease sharing.
Next, compare the key capture features side by side.
Comparison Tables and Key Callouts
If you're choosing between setup options, these side-by-side views make the decision easier. The goal is simple: pick the setup that gets the most uploads.
Most hosts use both: one station at the entrance and table signs at seats.
| Single Large QR Station | Multiple QR Table Signs | |
|---|---|---|
| Visibility | High at one fixed point | Visible all event |
| Guest effort | Guests must walk to it | Scan while seated |
| Best for | Entrances, check-in areas, and other high-traffic spots | Weddings, dinners, seated events |
| Printing cost | Lower (one print) | Higher (multiple prints) |
For most events, the best move is to pair one high-traffic station with table signs. That way, guests see the upload option when they arrive and again when they're sitting down.
For screens, the point is participation, not decor.
Live slideshows drive uploads; static slideshows only display photos.
| Static Slideshow | Live Guest-Upload Slideshow | |
|---|---|---|
| Content source | Pre-selected by host | Real-time guest uploads |
| Updates automatically | No | Yes |
| Drives more uploads | Rarely | Yes - seeing photos appear on screen encourages more uploads |
| Setup complexity | Simple (file on a laptop) | Requires an internet-connected display |
Use the plan that fits your guest count, upload volume, and storage needs.
Quick setup checklist:
- Print QR codes in dark ink on a white or light background, with 0.25–0.5 in. of clear space around the code.
- Use 8.5 × 11 in. signs for tables and 11 × 17 in. signs for entrance stations.
- Test the printed QR code on iPhone and Android from the exact distance guests will stand or sit.
With those choices set, the last step is making the upload path fast and obvious.
Conclusion
Taken together, these tactics make guest sharing feel like part of the event instead of one more task.
They work best as a group: visible QR codes, app-free uploads, timely prompts, live feedback, and a short follow-up message. When guests spot the code, hear the reminder, and get that follow-up, uploads tend to keep coming.
The same setup works well for weddings, birthdays, reunions, corporate events, and sporting events.
A single upload hub keeps things simple for guests and puts all your event photos in one place. Set it up once, and you have a repeatable way to collect more guest photos with less effort.
FAQs
How many QR signs do I really need?
For the best participation, put a QR code on every table. At smaller or more casual events, a single eye-level sign in a busy spot, like the bar, buffet, or registration desk, may be enough.
For larger events, use several signs at entrances, on printed programs, on screens, or as part of the table decor. However many signs you use, one clear announcement from the host or MC helps guests spot them.
What if guests do not want to download an app?
Guests can still share photos the easy way - no app and no account needed. Just place a QR code on tables or event handouts, and guests can scan it with their phone camera.
That opens a secure upload page in their mobile browser. From there, they can pick photos from their camera roll and upload them in seconds.
When should I send the follow-up upload reminder?
Prompt guests during the event while the energy is still high, especially right after big moments like speeches, the first dance, or the cake cutting. If you wait until the end of the night, people are often tired, distracted, or halfway out the door.
It also helps to keep the upload window open for a few days, or even up to a week after the event. Some guests are more likely to share their photos once they’re back home and have a minute to look through their camera roll.